winxp绑定
下面是我自己用的脚本,由于我的宽带网络与其他邻居共享使用,为了防止邻居非法访问电脑,所以在【开始】---【程序】---【启动】里添加Anti-arp.bat批处理文件,内容如下:
@echo off
:清空arp
arp -d
:禁止其他ip访问本地,C8-3A-35-C6-E8-3B为本地网卡MAC
for /l %%i in (2,1,254) do arp -s 192.168.3.%%i C8-3A-35-C6-E8-3B >nul 2>nul
:排除其他服务器,192.168.3.2为我局域网内另外一台路由器,192.168.3.1为路由器ip
arp -s 192.168.3.2 B0-48-7A-62-4D-4A
arp -s 192.168.3.1 00-0e-a6-3f-d8-50
exit
运行后,这样后本地电脑只能ping通网关和192.168.3.2那台路由器,同理,局域网的邻居也ping不通我的电脑,达到简易防火墙和反arp病毒功能。
windows 7绑定
由于windows 7不能使用arp -s绑定默认网关,会提示:ARP 项添加失败: 请求的操作需要提升。 (英文版提示:The ARP entry addition failed: Access is denied. ) 需要通过netsh命令绑定
第一步:检查自己的网卡接口序号
首先点击开始-运行,输入CMD回车,进入DOS模式。然后输入:netsh interface ipv4 show neighbors 查看一下地址的属性,如图所示
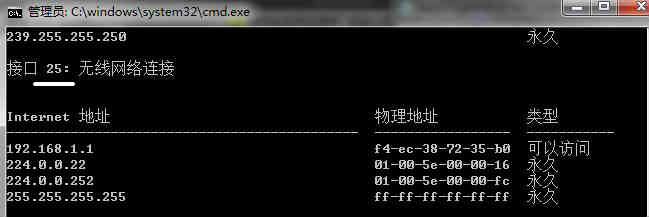
“192.168.1.1 f4-ec-38-72-35-b0” 也就是网关的IP地址,后面的类型是“可以访问”,这代表着此地 址还没有绑定。上面的接口是:25。(记住这个25,每台机器的接口号都不太一样,大家可以自己查一下)
第二步:使用命令绑定地址
netsh interface ipv4 set neighbors 25 "192.168.1.1" "f4-ec-38-72-35-b0" store=active
netsh interface ipv4 set neighbors 25 "192.168.1.1" "f4-ec-38-72-35-b0" store=persistent
“store=active”代表命令当前有效,重启后失效。“store=persistent”代表永久有效,想要恢复为动态时,使 用"arp -d"删除arp缓存信息即可。
第三步:检查效果
在命令行下输入arp -a,然后回车。显示如图中所示“192.168.10.1 f4-ec-38-72-35-b0 静态”。表示已经生效,IP 地址与MAC地址成功绑定了!
bat批处理文件
arp -d
for /l %%i in (2,1,254) do netsh interface ipv4 set neighbors 11 "192.168.3.%%i" "84-4B-F5-B8-7C-D7" store=persistent >nul 2>nul
netsh interface ipv4 set neighbors 11 "192.168.3.1" "10-6f-3f-38-38-65" store=persistent
netsh interface ipv4 set neighbors 11 "192.168.3.2" "78-44-76-25-47-2d" store=persistent
netsh interface ipv4 set neighbors 11 "192.168.3.3" "00-1f-33-37-2f-84" store=persistent
netsh interface ipv4 set neighbors 11 "192.168.3.82" "24-db-ac-df-0a-82" store=persistent
netsh interface ipv4 set neighbors 11 "192.168.3.12" "70-72-3c-d5-3f-d4" store=persistent
exit
windows7 相关命令
- 查看网卡ID netsh interface ipv4 show neighbors
- 清空永久还原(需要重启电脑生效)netsh i i reset
- 清空临时还原(不需要电脑重启)arp -d
- 查看当前的arp列表 arp -a